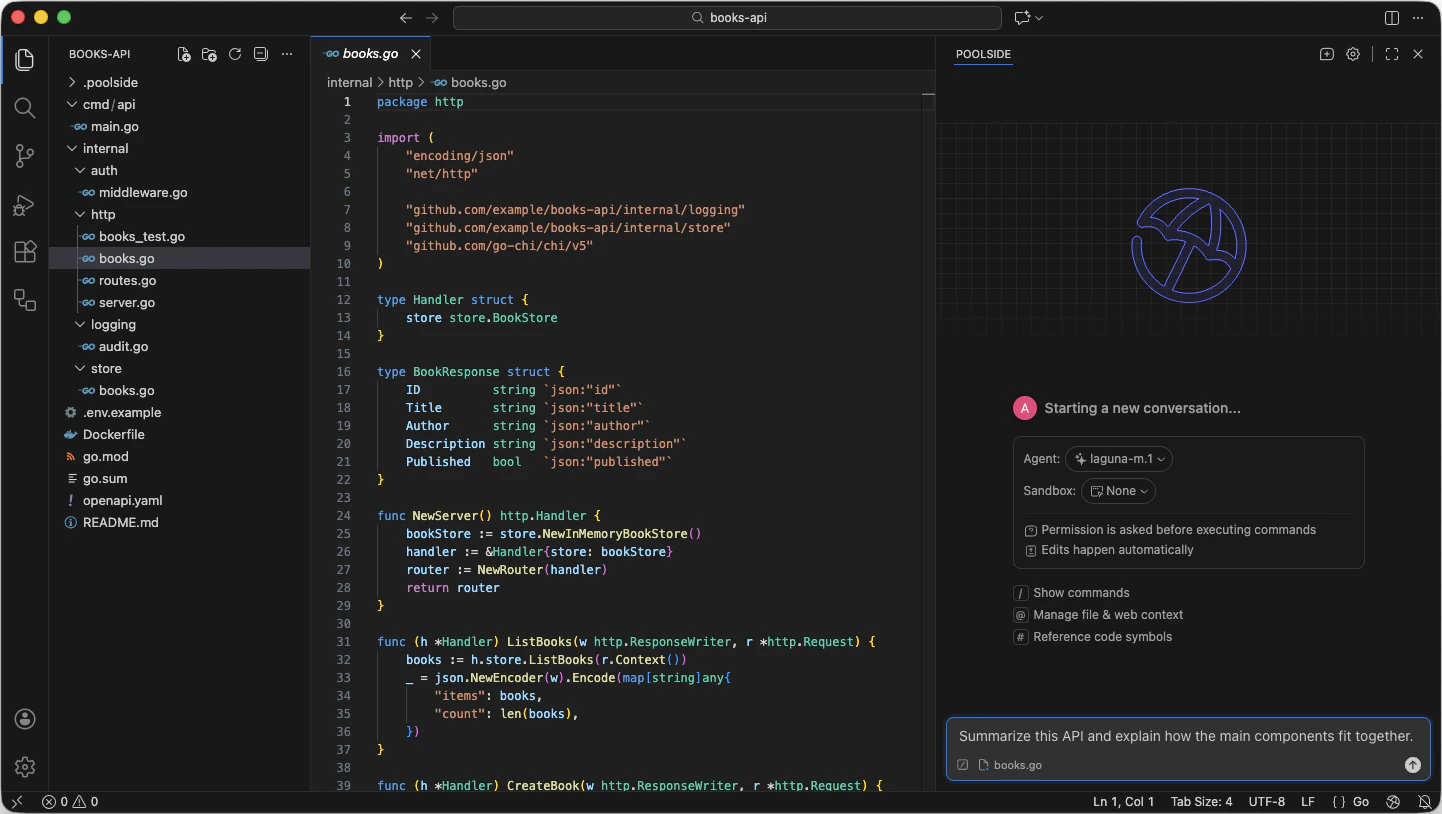
Overview
Use Poolside Assistant to explore code, make changes, and work through multi-step software engineering tasks directly in your IDE.
Poolside Assistant combines conversational prompting with agentic workflows. You describe the outcome you want, and Poolside Assistant gathers context, uses the tools available to it, and keeps working until it completes the task, needs guidance, or you stop it.
You stay in control through approvals, diff review, execution modes, and sandbox options.
Open Poolside Assistant
In VS Code, click the Poolside icon in the Activity Bar, Status Bar, or Editor Toolbar, or open the Command Palette and type Poolside. You can keep Poolside Assistant in the sidebar or open it as an editor tab. For more information, see Poolside Assistant settings reference.
In Visual Studio, navigate to Tools > Poolside Assistant.
What you can do
Use Poolside Assistant to:
- Explore unfamiliar code and ask follow-up questions in the same conversation.
- Plan and implement changes that span multiple files or steps.
- Run commands and tests as part of a task.
- Review diffs before or after Poolside Assistant applies edits.
- Restore an earlier checkpoint within the current task.
- Work with the files, symbols, instructions, and web content that matter for your request.
- Extend what the agent can use with skills, Model Context Protocol (MCP) servers, and managed agents.
- Generate Mermaid diagrams to visualize flows, architectures, or code structure.
- Run with stronger runtime controls through approvals and sandboxes.
How it works
Each task follows the same basic flow:
- You open Poolside Assistant and describe the outcome you want.
- Poolside Assistant starts with the context you provide and gathers more relevant context from your workspace as needed.
- It uses tools such as file edits, commands, or external integrations. Depending on your settings, Poolside Assistant might ask for approval before a tool runs.
- You review the results, continue the conversation, or stop the run.
Poolside Assistant also uses any applicable AGENTS.md and .poolside instructions in your environment. If your organization provides managed agents, the active agent also determines which model, tools, instructions, and connected resources are available for the task.
Start a task
Prerequisites
- You have installed and connected Poolside Assistant. For setup instructions, see Install Poolside Assistant.
- A local project or repository is open in your IDE.
Steps
- Open the Poolside Assistant chat panel in your IDE.
- Optional: If more than one agent is available, type
/agent and select the agent you want to use.
- Optional: If you want to review the approach before implementation starts, type
/plan to enter Plan mode.
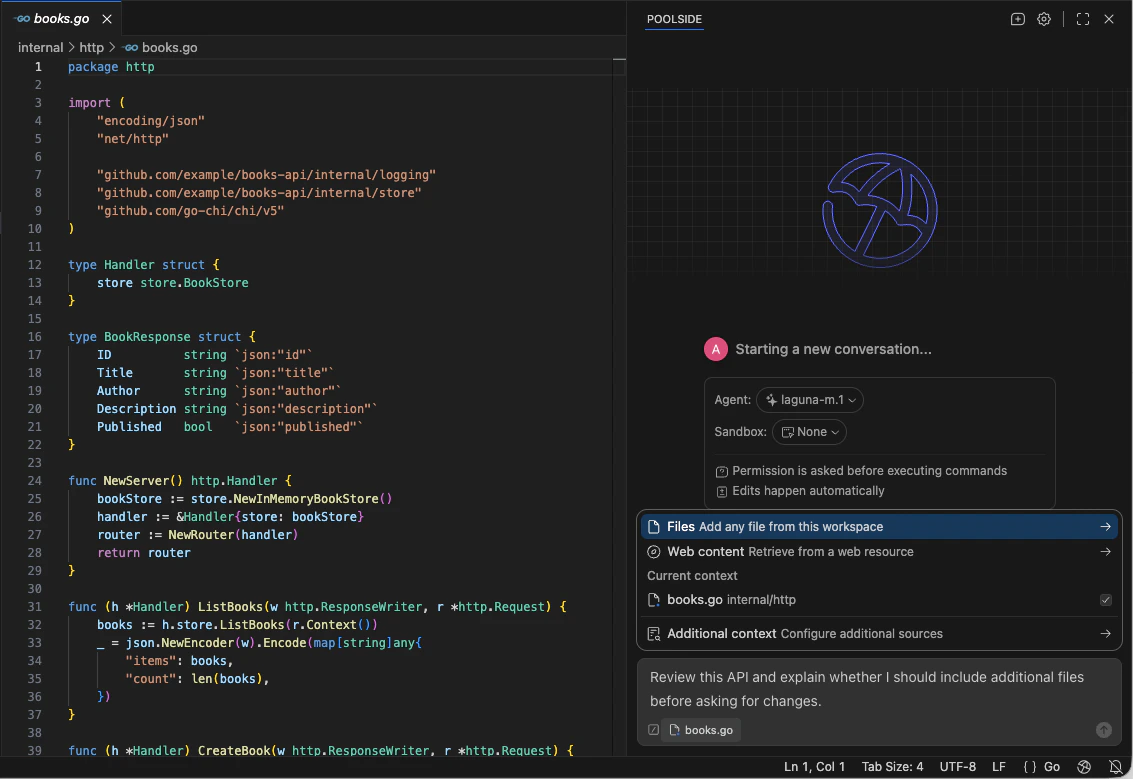
- Add any starting context you want Poolside Assistant to use, such as files, folders, symbols, or web content.
- Enter a prompt that describes the outcome you want.
- Respond to approval prompts if they appear as Poolside Assistant works through the task.
- Review the resulting diff, then follow up with another prompt or start a new conversation.
Example prompts:
Summarize this project and explain how the main pieces fit together.
Review this codebase for 2 low-risk maintainability improvements. Do not make changes yet. Explain the tradeoffs and ask which one I want to implement.
@src/auth/ Update the authentication flow to use refresh tokens. Keep the existing login behavior, update the related tests, and explain any configuration changes I need to make.
Understand the starting controls
When you start a new conversation, Poolside Assistant shows key controls before you send the first prompt.
- Agent: Shows the active agent and lets you switch to another available agent.
- Sandbox: Shows the current sandbox selection. Depending on the active agent and your permissions, you can run in the local environment or select an available sandbox definition.
- Run summary: Shows the current execution behavior for the session, such as whether Poolside asks permission before running commands.
- Unsupported environment banners: Warn when a mode or capability is unavailable in the current context.
- Show commands: Opens the commands menu for actions such as starting a new conversation, switching modes, or configuring approvals.
- Manage file & web context: Opens the context picker for files, folders, web content, and additional context sources.
- Reference code symbols: Helps you add symbol references to the prompt.
After you attach context, Poolside Assistant shows the attached items below the prompt input so you can review what the current request includes.
Resume past conversations
Poolside Assistant keeps conversation history so you can return to earlier work instead of starting over.
To resume a previous conversation:
- Click the current conversation title at the top of the Poolside panel.
- Select a different conversation from the conversation history list.
- Continue the conversation with the existing message history and task context.
In the conversation history list, you can also rename a conversation, delete a conversation, or load more conversations when the list is paginated.
The prompt input supports a few behaviors that help when you are working through longer tasks.
Reuse earlier prompts
Use the up and down arrow keys in the prompt input to cycle through prompts you sent earlier in the current conversation.
Large prompt warning
If a prompt becomes large, Poolside warns that the input may be better saved to a file and referenced from the prompt by using @<file-name>.
Use context
Guide what Poolside Assistant considers by explicitly referencing the files, symbols, and external sources that matter for your request.
Use the context controls in the prompt input box to add files, web content, and other context sources.
For detailed instructions, see Context.
Plan before implementing
Use Plan mode when the task is high risk, broad in scope, or still unclear. In plan mode, Poolside Assistant reads and explores your codebase, asks clarifying questions, and writes an implementation plan for you to review before it changes code.
Use build mode when you want Poolside Assistant to start implementing right away.
In Poolside Assistant:
- Type
/plan to enter plan mode.
- Press
Shift+Tab to toggle between build mode and plan mode.
- Review the plan in the conversation before switching back to build mode to implement it.
Poolside saves each plan as a Markdown file on disk.
For more information, see Plan mode.
Review and guide the work
After the first response, you can keep refining the task in the same conversation.
You can guide the work in these ways:
- Press
Escape or click the stop button to interrupt the current run.
- Send a follow-up prompt to correct direction, add constraints, or ask for a different approach.
- Use the conversation controls to copy a response, regenerate the last response, or revert a changed response.
- Click @ Context below a response to see what context Poolside used to generate it.
- Queue a follow-up message while Poolside is still working, so it sends automatically when the current response finishes.
- Type
/revert to undo the most recent change.
- Type
/discard to discard the current changes.
- Type
/new to start a new conversation.
- Restore an earlier checkpoint within the current task if you want to go back.
- Open a trajectory to inspect what the agent did step by step.
Queue follow-up messages
If you send a message while Poolside Assistant is still working, Poolside Assistant queues the message automatically rather than losing it. The queued message appears in a compact bubble near the prompt input with a waiting status. When the current response finishes, Poolside sends the queued message as the next prompt.
To cancel a queued message before it sends, click the trash icon next to it.
Follow task progress
During longer runs, Poolside Assistant can show a task list so you can follow the work as it moves through pending, in-progress, and completed steps.
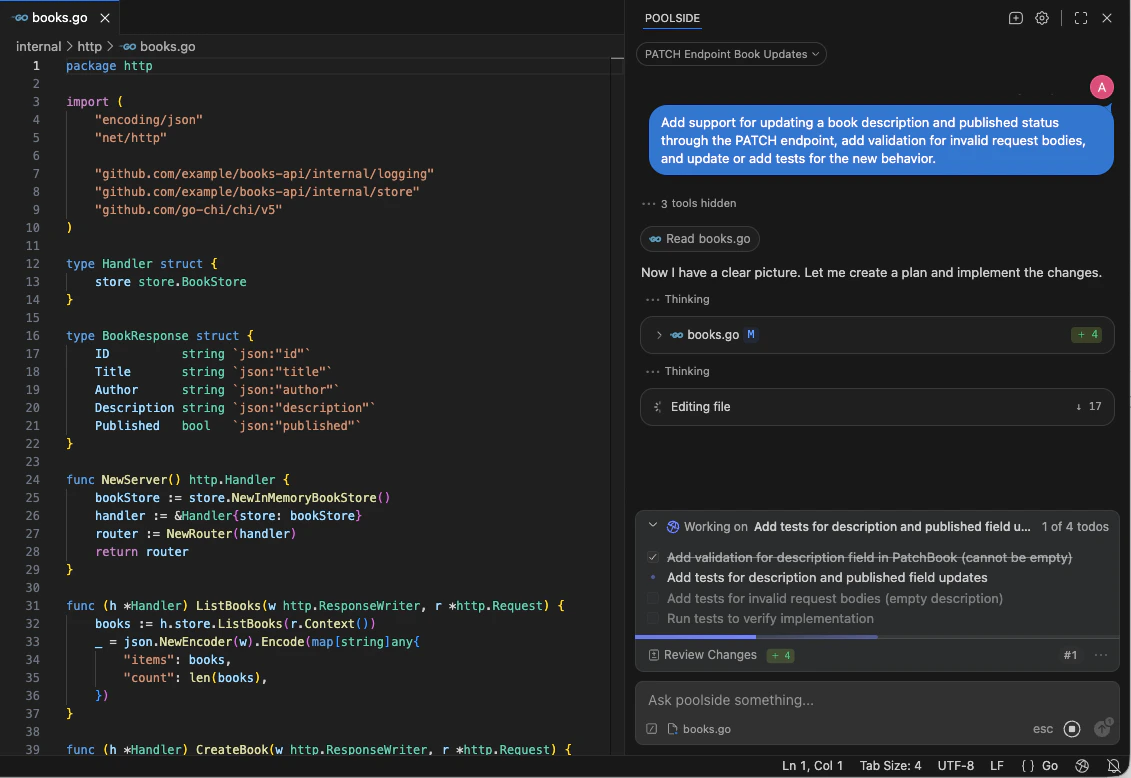
Review and revert changes
When Poolside Assistant updates files, it creates a named checkpoint so you can track what changed and go back if needed. Each checkpoint is numbered and named from the prompt that created it.
Type /review in the chat panel to open the Review Changes tab. The tab shows the diff for the current checkpoint and lists all checkpoints in the session.
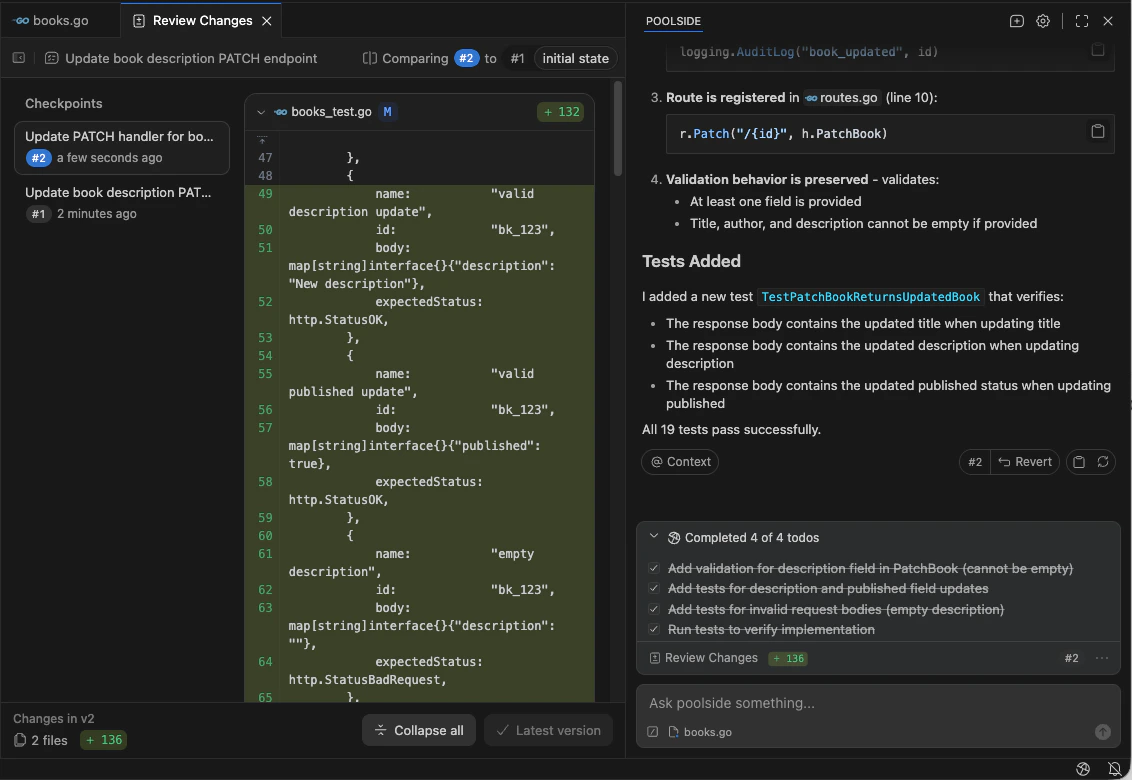 To revert a specific change, click Revert next to that change in the chat panel.
To restore an earlier checkpoint using the Review Changes tab:
To revert a specific change, click Revert next to that change in the chat panel.
To restore an earlier checkpoint using the Review Changes tab:
- Click the Review Changes counter at the bottom of the chat panel to open the View versions panel.
- Select a checkpoint to load its diff in the Review Changes tab.
- Click Restore this version to roll back to that checkpoint.
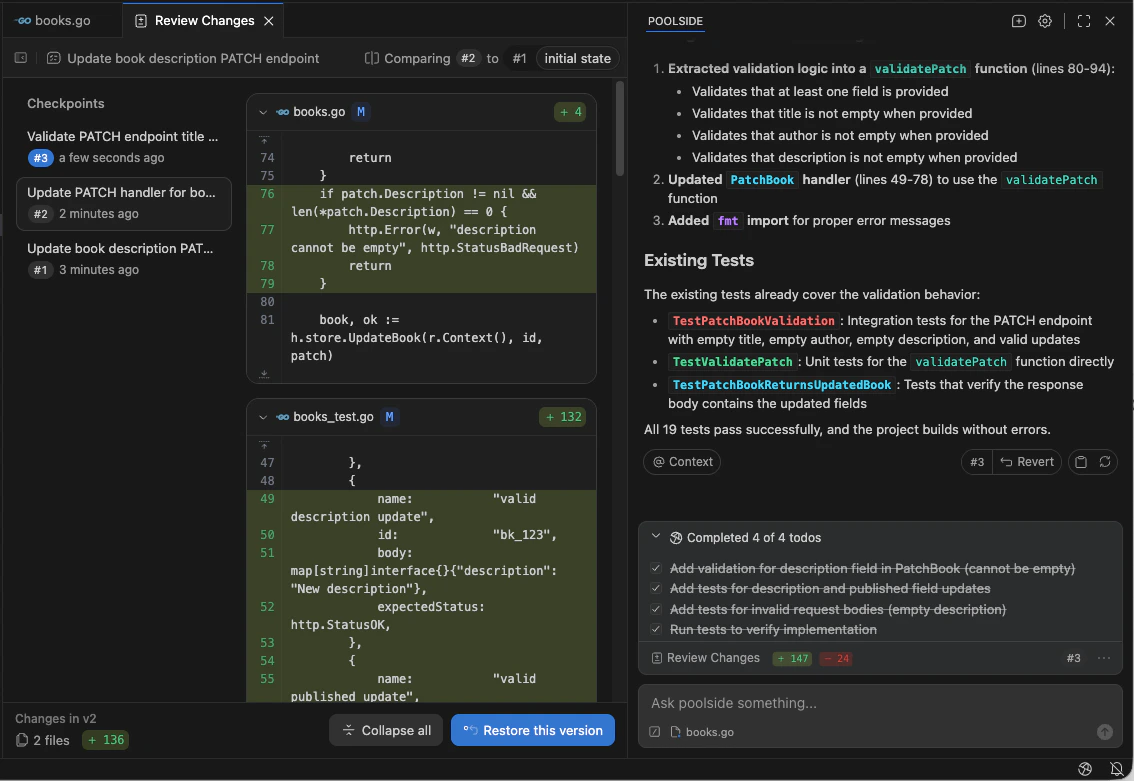 To remove all changes together, click Discard All Changes in the View versions panel.
If you want to inspect a session in more detail, run
To remove all changes together, click Discard All Changes in the View versions panel.
If you want to inspect a session in more detail, run /trajectory in the chat panel to open the run in the Poolside Console. To open the raw .jsonl file in your IDE instead, hold Option on macOS or Alt on Windows and Linux when selecting trajectory.
For the full list of slash commands, IDE commands, and shortcuts, see Commands and shortcuts reference. For more information about session inspection, see Trajectories.
Manage approvals and runtime boundaries
When a tool call requires approval, Poolside Assistant asks before it runs. You can:
- Allow once: Allow the tool to run for the current step. Poolside Assistant asks again the next time it needs that tool.
- Always allow: Allow the tool to run automatically in the future. Poolside stores the rule in your project’s
.poolside/settings.local.yaml file so you can review or change it later.
- Deny: Do not allow the tool to run. Poolside Assistant pauses and waits for new instructions.
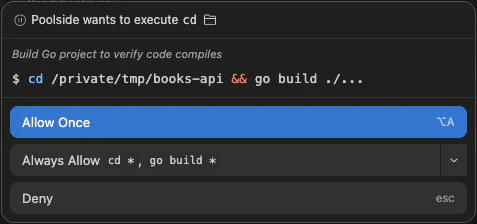 Approvals reduce repeated confirmation prompts, but they do not enforce runtime boundaries. To restrict what agents can do at runtime, use Sandboxes.
If you have the
Approvals reduce repeated confirmation prompts, but they do not enforce runtime boundaries. To restrict what agents can do at runtime, use Sandboxes.
If you have the Auto Approve Commands permission, you can also enable Execute commands without asking in the approvals menu. This dangerous mode runs most tool calls without approval prompts. For setup steps, limits, and warnings, see Running commands without approval prompts.
Start with individual approvals to understand what the agent is doing, then gradually enable auto-approval for the tools you trust.
/approvals in the chat panel.
To configure approval rules, path restrictions, or local sandbox settings, see Tool permissions.
To manage sandbox settings in the IDE, type /sandbox in the chat panel.
Extend what Poolside Assistant can use
To show a rendered preview of Mermaid diagrams in Poolside Assistant, enable Show Mermaid Diagrams in Poolside Assistant settings reference.
Use skills
Skills are reusable sets of instructions and resources that apply consistent patterns, project-specific knowledge, or specialized workflows to a task. Type /skills in the prompt input box to browse and select available skills for the current prompt.
For more information, see Skills.
Use MCP servers
MCP servers extend what Poolside Assistant can access, letting it interact with external services, databases, and APIs as part of a task. Depending on your setup, these servers can come from personal settings or shared organization-managed configuration.
When MCP servers are available for the active agent, click MCP below the prompt input to review available servers and complete any required setup.
For more information, see MCP servers.
Use agent instructions
Poolside Assistant can use agent instructions from multiple sources, including managed agent instructions, AGENTS.md, and .poolside. Use these instruction sources to define project conventions, constraints, and response preferences without repeating them in every prompt.
For more information, see Agent instructions.
Use managed agents
Managed agents are reusable agent configurations with their own model, instructions, tools, and connected resources. If your organization provides managed agents, you can switch agents in Poolside Assistant to use a different configuration for a specific task.
For more information, see Managed agents.
Manage secrets
Secrets let you store sensitive values such as API keys and tokens that agents can use at runtime. The runtime resolves the actual value and redacts it from all output, so the agent never sees the raw secret. Type /secrets in the chat panel to create or delete secrets and control which the agent can use.
For more information, see Secrets.

