1. Introduction
This guide assumes the administrator performing the deployment is familiar with Infrastructure as Code (IaC) and AWS services and network architectures. Before beginning, Poolside recommends that you review the entire document to understand the requirements. If you have any questions, contact Poolside before starting the installation process.2. Architecture
The following diagram illustrates the Poolside architecture after a successful deployment.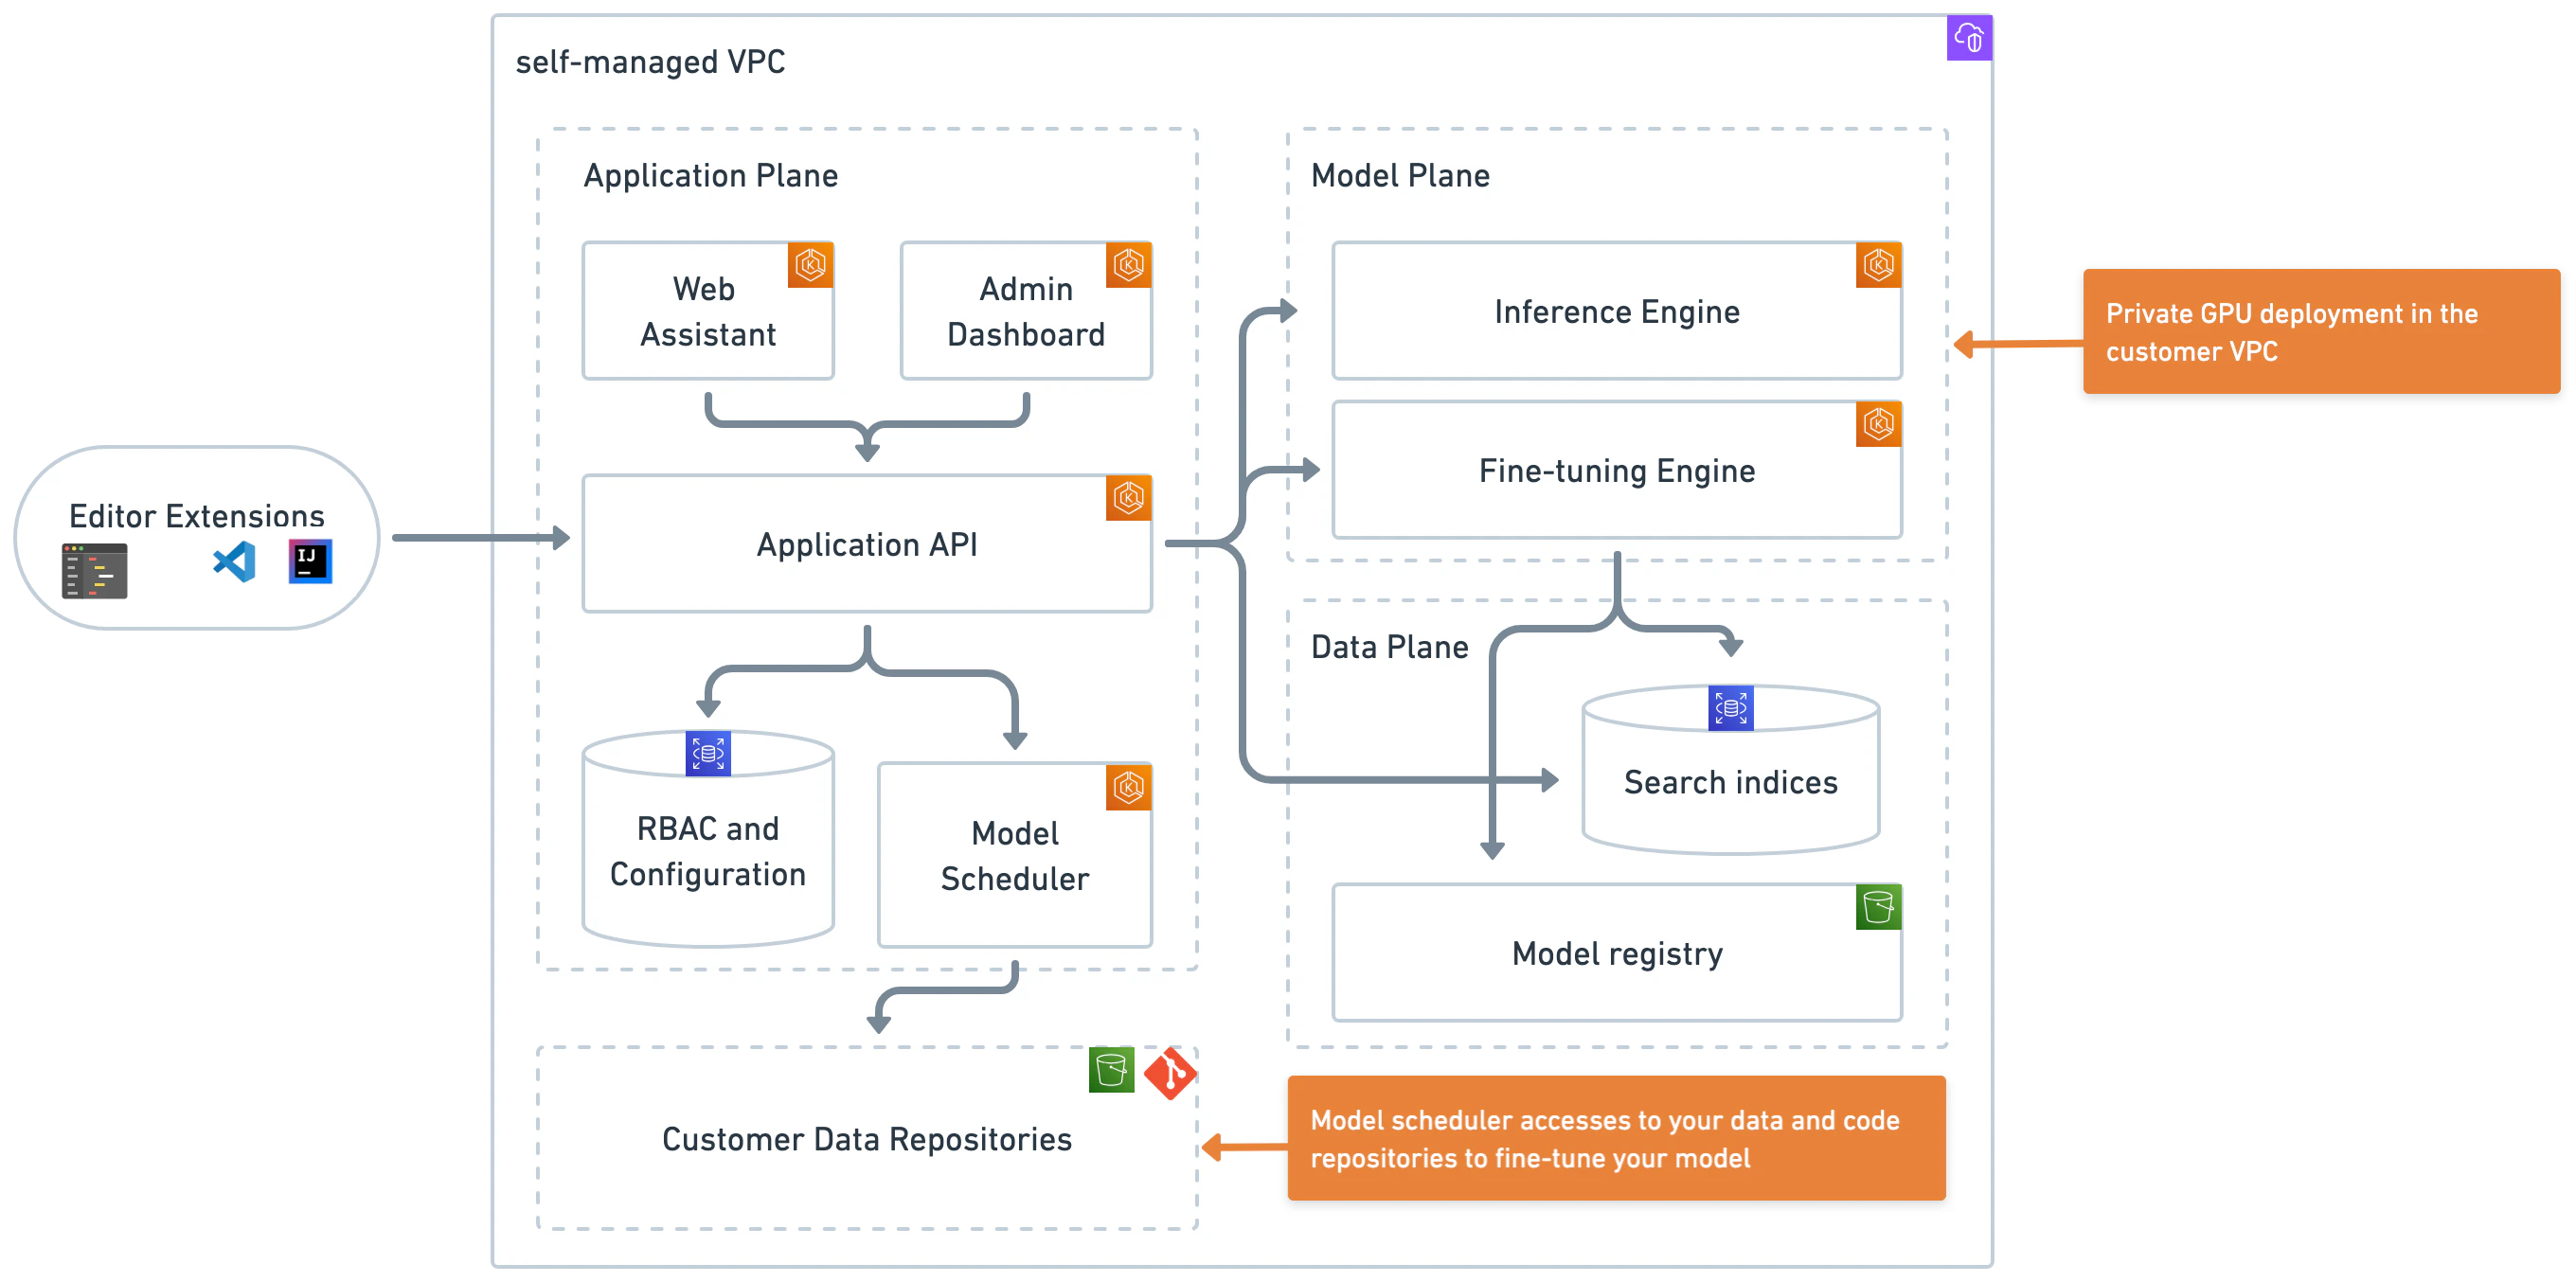
3. AWS and tooling requirements
3.1. Requirements overview
Ensure you meet the following deployment requirements before starting the installation. This guide assumes general knowledge of the technologies involved, but provides detailed instructions to ensure clarity and ease of implementation. Poolside is available to provide assistance throughout the deployment process as needed.3.2. AWS resources
For each instance of a Poolside deployment on AWS, you need:- A target VPC for Poolside installation
- Including P5 GPU capacity
- Subnet IDs for:
- EKS control plane
- Private pod networking
- A work environment with:
- Valid AWS credentials
- Access to EKS control plane subnet
- Access to pod networking subnet (for validation)
3.3. Tools
Install the following tools in the environment where you run the deployment commands. The recommended approach is to run the deployment from a bastion host in the target VPC. If you deploy from a bastion host, install these tools on that host. If you deploy from a local machine, install them locally and ensure network access to the required AWS subnets.- Terraform version 1.9.8+
- Helm version 3.16.3
- Helmfile version 0.169.1+
- kubectl client version 1.31.2+
- AWS CLI version 2.22.0+
- cURL
3.4. Poolside assets
Obtain access to the following components from the Poolside team before starting the deployment:- Terraform and Helm charts
- Three container images to store in ECR:
- API
- Web Assistant
- Inference
- Splash client
- Model weights
- IDE extension
3.4.1. Confirm the environment has the necessary permissions
To verify the AWS CLI configuration and authentication setup, run the following command to list the IAM users, groups, and policies in the target AWS account:3.4.2. AWS VPC and subnet setup
Use the provided network deployment Terraform script as a starting point to create the required AWS networking resources. Modify the Terraform configuration or use an alternative provisioning method if organizational requirements or constraints apply. The provided Terraform serves as a reference for the minimum resources needed. Prepare the following AWS VPC resources before proceeding with the Poolside deployment:- A dedicated AWS VPC
- Two VPC subnets for inter-pod connectivity (
private_subnet_ids) - Two VPC subnets for control plane services (
control_plane_subnet_ids)
3.4.3. Network access requirements
Allow outbound network access so Poolside can ingest Git repositories and user-approved URLs. Ensure routing rules and network access controls permit these connections.3.4.4. Select a deployment method and set up tooling
After completing the AWS networking setup, select a deployment method:-
Bastion host (recommended)
- Follow the Bastion Host Deployment guide
-
Local machine
- Install all required dependencies
- Ensure network access to the target EKS environment
4. Infrastructure deployment
Use Terraform to deploy the required infrastructure. After this step completes, the core Poolside infrastructure components are in place. Before running any commands, configure the AWS CLI to use the correct AWS account and region in the environment where you run the deployment. For setup instructions, see the AWS CLI documentation.4.1. Extract the Poolside bundle and set the working directory
Extract the Poolside files into a new directory. Set this directory as the working directory by running:WORKDIR to move between installer file and script directories in the following steps.
4.2. Set up the configuration files
Navigate to theiac directory:
$WORKDIR/iac/terraform.tfvars using the following template. Replace each placeholder with the appropriate values from the previous sections.
If you plan to use permissions_boundary_arn, uncomment the line and provide the required IAM boundary ARN.
For the GPU node group, use the
AL2_x86_64_GPU AMI type or an AMI that includes NVIDIA drivers.4.3. Deploy the infrastructure
Prepare the working directory for Terraform. Runterraform init to download the required providers and modules, initialize the backend for state storage, and validate the configuration.
remote.tf file in $WORKDIR/iac and replace the S3 bucket and DynamoDB table values with the appropriate resources. For additional details, see the HashiCorp S3 backend documentation.
remote.tf
terraform init to validate the remote backend configuration and confirm that no configuration or access errors occur.
After configuring the variables and, if applicable, the backend, run terraform plan to review the execution plan and see the list of resources Terraform will create:
yes to proceed.
A typical run takes approximately 15 minutes and results in a configured, functional EKS cluster.
On successful completion, Terraform displays several output values similar to the following:
4.4 Manage database credentials
Rotate RDS database credentials on a regular basis. Use existing internal processes or third-party services to manage credential rotation. To rotate the credentials using Terraform:- Update the
random_stringkeeper value inprepare_values.sh. - Run
terraform plan. - Run
terraform apply. - Run the
prepare_values.shscript.
You can also configure the Terraform scripts to store RDS database credentials in AWS Secrets Manager. Coordinate with your Poolside representative to adapt the deployment scripts as needed.
5. Kubernetes configuration
5.1. Connect to the Kubernetes cluster
After deploying the EKS cluster, verify that it is running. Configure your kubeconfig to point to the newly deployed cluster:5.2. Configure the Kubernetes cluster
Configure the Kubernetes cluster with the correct container image locations. Poolside uses two images: one for the API and one for inference. Provide the appropriate registry and tag values to theprepare_values.sh script based on where the images are stored.
--api-registry: Registry for the API image--api-tag: Tag for the API image--inference-registry: Registry for the inference image--inference-tag: Tag for the inference image
scripts directory:
api-registry and api-tag, for example:
kube/values directory:
core-api-generated.yamlfluent-bit-generated.yaml
5.3. Deploy the Poolside infra-check application with Helmfile
This step requires Helm and Helmfile. See Tools. Navigate to thekube directory:
helm diffhelm s3helm secretshelm git
5.4. Verify that the Poolside API is running
Confirm that the system is operational by checking that the pods are running:/docs in a browser using the URL associated with the core-api service. For example, if the output shows http://hostname.elb.us-east-2.amazonaws.com, open:
6. DNS and SSL configuration
Configure DNS and SSL to ensure secure and reliable communication between Poolside components. These instructions describe how to use the default Poolside NGINX Ingress Controller, an AWS Certificate Manager (ACM) certificate, and a single domain with conditional logic.This section provides high-level guidance. Adjust the steps as needed to meet specific deployment requirements.
6.1. Overview
This guide follows these steps:- Select a domain or subdomain for the API, referred to as
<api.domain.com>(for example,api.poolside.com). - Create a DNS CNAME record that points to the Elastic Load Balancer address returned by
kubectl get ingress. - Request an SSL/TLS certificate for the selected domain using AWS Certificate Manager (ACM) in the same AWS region as the EKS cluster.
- Configure the NGINX Ingress Controller service to use the SSL certificate.
- Configure host-based routing so requests to the domain route correctly.
- Allow inbound HTTPS traffic (port 443) to the API endpoint in firewall and network policies.
6.2. SSL configuration file
Use theingress-nginx-ssl.yaml file in the kube/values directory to configure SSL for the ingress. Populate this file with the SSL certificate details.
The default configuration uses AWS Certificate Manager. Modify the configuration if a different certificate provider is required.
enableSSL setting in the next step is set to true.
6.3. Custom values configuration
In thekube/values directory, open custom-values.yaml and replace the placeholders with the required values:
enableSSL is set to false (the default), the Helmfile deployment uses the non-SSL ingress configuration.
6.4. Apply changes
Save all modified files, navigate to the top-levelkube directory, and reapply the Helmfile by running:
6.5. Confirm the ELB hostname
Changes to the Ingress Controller Service configuration may cause Kubernetes to provision a new Elastic Load Balancer with a different DNS hostname. If this occurs, update the DNS CNAME record accordingly. In some cases, Kubernetes updates the existing load balancer without changing the hostname. To confirm the current load balancer hostname, run:6.6. Validate the HTTPS endpoint
After DNS and certificate changes propagate (typically within minutes, but up to 48 hours), test the HTTPS endpoint by running:7. OAuth and SSO configuration
Configure OAuth and Single Sign-On (SSO) by integrating Poolside with an existing identity provider (IdP) using the OpenID Connect (OIDC) protocol. This guide describes configuration using Amazon Cognito or Keycloak, and the same approach applies to any OIDC-compliant provider.7.1. Overview
Follow these high-level steps to configure OAuth and SSO:- Identify an existing (or set up a new) Identity Provider (IdP)
- Obtain OIDC credentials from your IdP:
- Client ID
- Client Secret
- Provider URL (often called Discovery URL or Issuer URL)
- Configure your IdP for Poolside:
- Set the Redirect URI to:
https://<api.domain.com>/auth/callback - Ensure that the necessary scopes are enabled:
openid, profile, email
- Set the Redirect URI to:
- Update your
values/custom-values.yamlfile with the OIDC configuration - Apply the configuration changes to your Poolside deployment
- Verify the SSO setup
7.2. Example: Configure Amazon Cognito
Complete the following steps to configure Amazon Cognito as the identity provider.- Sign in to the AWS Management Console and open the Amazon Cognito service.
-
Create a new user pool or select an existing one.
If you create a new user pool:
-
Create a new user pool in Amazon Cognito.
- Select
Traditional web applicationfor Define your application. - Under Options for sign-in identifiers, select
Email. - Create the user pool and open the user pool overview.
- Select
- Under Authentication methods, keep the default password policy or define a custom policy as required.
-
Under Sign-in:
- Configure multi-factor authentication as needed.
- Leave user account recovery settings at their defaults or adjust as required.
-
Under Sign-up:
- Keep self-service sign-up enabled.
- Use the default attribute verification and confirmation settings unless specific requirements apply.
- For proof-of-concept deployments, enable Cognito-assisted verification and confirmation.
-
Create a new user pool in Amazon Cognito.
-
After the user pool is created, open Applications → App clients and select the existing app client created by Cognito.
-
Edit the app client information.
- Under Authentication flows, enable
ALLOW_USER_PASSWORD_AUTHand disable all other flows.
- Under Authentication flows, enable
-
Under Login pages, edit the managed login page configuration.
- Set Allowed callback URLs to
https://<api.domain.com>/auth/callback. - Enable the Authorization code grant OAuth 2.0 flow.
- Enable the OpenID Connect scopes
openid,email, andprofile.
- Set Allowed callback URLs to
- Copy the Client ID and Client secret. These values are required for the Poolside configuration.
-
Edit the app client information.
- Configure branding and a domain for authentication. For proof-of-concept deployments, the default Cognito domain is sufficient.
-
Copy the
issuerURLvalue from the app client example code. Use this value as theproviderURLin the Poolside configuration. - Proceed to Configure Poolside to complete the OAuth and SSO integration.
7.3. Example: Configure Keycloak
To use a self-managed identity provider, configure an existing Keycloak deployment or deploy Keycloak in the target environment. Ensure Keycloak is accessible over HTTPS and uses a valid SSL certificate before proceeding.- Sign in to the Keycloak Admin Console using administrator credentials.
- Create a new realm or select an existing realm.
-
Create a new client:
- Set Client ID to a meaningful name for the Poolside deployment.
- Set Client Protocol to
openid-connect. - Set Access Type to
confidential. - Set Valid Redirect URIs to
https://<api.domain.com>/auth/callback.
- After creating the client, open the Credentials tab and record the Secret value.
-
Configure client scopes:
- Open the Client Scopes tab.
- Ensure the
openid,email, andprofilescopes are selected and assigned to the client.
-
Record the
providerURL,clientID, andclientSecret.
8. Configure Poolside
Use the Splash CLI to complete the initial Poolside setup.8.1. Prerequisites and required information
Before starting, ensure the following are available:- A system with a graphical interface, browser access, and network connectivity to the Poolside deployment
- The Splash CLI, provided by Poolside via S3, installed and available in the system
PATH - The Poolside API URL (
https://<api.domain.com>), as configured in 6.6. Validate the HTTPS endpoint - OIDC credentials from the selected identity provider:
- OIDC Client ID
- OIDC Client secret
- OIDC Provider URL
- Redirect URL:
https://<api.domain.com>/auth/callback
8.2. Retrieve the bootstrap token
On initial startup, Poolside has no tenants and generates a bootstrap token for first-time setup. Run the following command to identify a pod, retrieve its logs, and extract the bootstrap token:8.3. Configure the tenant
Create asplash-config file and replace all <...> placeholders with the appropriate configuration values:
cat splash-config. Then run the Poolside CLI as follows:
The Cognito configuration sets the callback URI automatically. If you use a different authentication provider, ensure the callback URI is configured on that provider.
When using Cognito for a proof-of-concept deployment, create a user account first by completing the sign-up flow before attempting to log in.
8.4. Create a team
The first user to log in becomes the administrator by default. Create teams to onboard additional, non-administrator users. Use thesplash teams create command to create a team.
For example, to create a team named engineering and automatically include users with email addresses ending in @my-domain.com, run:
9. Load models into Poolside
Poolside supports two inference mechanisms. Select the option that matches the deployment requirements.Amazon Bedrock
Serverless inference
VPC inference
Self-managed compute
10. Configure the IDE extension
The IDE extensions are not available in public marketplaces and are provided by the Poolside team for internal distribution. Open the Poolside extension settings in the IDE and set thepoolside URI to the API hostname configured in the earlier deployment steps.